Showing posts with label client project. Show all posts

Monday, March 3, 2014

Client follow up


We recently posted about new client work and the process we go through with our clients. To continue that thought, we wanted to share the final designs that our client picked. When we present room plans we offer one edit with our initial service.  At the final presentation, our cute client told us about a super affordable saddle leather sofa she stumbled upon, so we added it into the final revision.


She loves the idea of painting the brick white and is going to first try white washing it herself, and if that is not enough, she will paint it with more coats of paint.  The couple was thrilled with our plans and we provided the vision that they have dreamed of. Now they have a roadmap to follow to do it on their own.


We offer flexible options for our clients are happy to work on design plan only, on an hourly basis, or providing full service design and install.  The variety in our work, the different clients we encounter, and the various degrees of assistance keep it ever changing and totally fun and creative for us.  It's about helping them create a home they love.


Tuesday, February 18, 2014

New client work


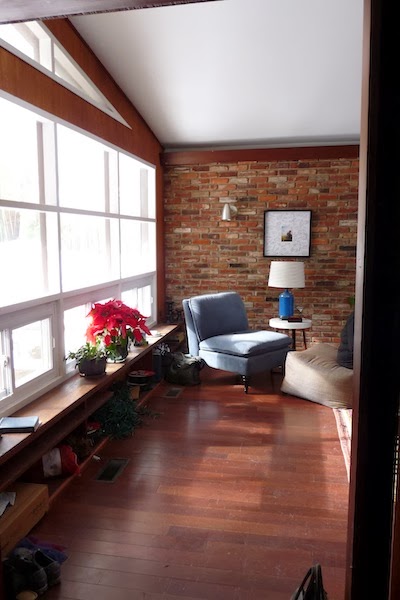
Tonight we are presenting multiple room plans to a new client.  This lovely young couple contacted us a year ago before moving into their mid-century modern ranch home. Since then they've made lots of improvements and had a baby, and now realize the need to have a plan before doing any more decorating. She had us come with the idea of reupholstering her sofa. This is often how it works. 
Here is a shot of her home.


Our process of doing room plans involves a face to face consultation if they are local to us.  We enjoy being in the home, taking some photos and interviewing the homeowner in person.  After alot of studio time putting different ideas together, we usually give much more to the client than one look per room. This time since we are dealing with a dark brick wall, dark floors and dark woodwork, we showed her what it looks like with the existing wood color, and also painting it all white. We came up with 3 room plans for the living room.


It is so easy to visualize the entire room this way. The white is so fresh and bright.
The adjoining dining room and kitchen all flow together, with a wall of windows that could use some softening with stationary drapes. 


With the removal of the walls dividing the kitchen and the living room, we are proposing an open plan with beautiful furniture finishes.


Then I did a drawing of a stone feature behind the range hood for look number 3.
Our goal in the presentation is to solidify the LOOK with the client. What often happens is they combine a few plans which is great, since we leave with a firm roadmap to follow.


(In the meantime, she realizes that putting over $1,000 into reupholstering her old sofa isn't worth it, and opts for a new model. Surprise.) Her initial purpose in having a set of room plans is to execute it on their own time and budget.  Sometimes this changes into us doing more after we present the plans and build the vision!

We'll let you know how it goes!

Monday, October 7, 2013

Project MIL Sneak Peek


Last month, Mom and I installed my dear MIL's living room!  We had so much fun zhushing it up for her and surprising her after she spent a weekend away.  Here's a sneak peek.


Next up was her kitchen.  A total redo and a dream client to work with!  I need to track down some 'befores' to show you the full effect, but until then, here's a peek.


We'll share more once we have some decent pics of the place. It turned out fantastic!


Tuesday, August 6, 2013

Mini Makeover


I spent the weekend at my MILs house - housesitting and keeping company with my husband's 97 year old grandmother while my MIL went away for the weekend to see her other son.  While she was gone, I got to work refinishing some furniture to fit into the new room plan we've been working on.  We found an adorable, perfectly sized chest on Craigslist for a great price and quickly dreamed up some designs for its new life.  It started off looking somewhat like this.


Although ours was much less gilt and much more off-white-that-had-yellowed-over-time.  Neve the mind since it had nice bones to work with.


So happy with the way it turned out!  Now to put a finish on it to keep it from chipping.  I don't want a high-gloss so I am not sure what time of urethane or mariner's finish to use.  Any suggestions?


Monday, July 15, 2013

Inside a Current Project

Lately Mom and I have spent some time working and reworking some designs for some current projects we have flying around.  With all of the tweaks and redesigns, I wanted to show you the insides of a current project and how the process has changed and evolved.

I mentioned that my MIL is redoing her kitchen and she's also redoing her living room, too.  It has been super fun to get to work with a family member AND working with both of my moms is such a plus!  We are trying to incorporate her existing furniture into a new plan for her main level family room.   

When she first mentioned redoing this room, I instantly got to work (in my head) imaging a plan for the room.  She wanted to do a light blue on the walls to make it lighter in the space.  Despite having a french door and five windows in this room, they live in the woods and what light they do have gets filtered throughout the day.  

My very first design plan was inspired by the colors in this room.


It's light and airy and similar to a color she has used throughout the lower floors in her home already.  And would hold up well to her saddle leather furniture.
When we really started putting our heads together on the direction of the room, she said would like to keep her current room-size Persian in the room (because duh, it's a room sized Persian!).  She also wanted something a bit different from the rest of the house's light blueish green wall color so we went bolder.  In order to hold up to the dark Persian and the leather furniture we opted for a darker blue with a bit of a library feel.  We're going to paint underneath the chair rail a bright white and maybe add some mouldings for detail.

After the weekend, we've already tweaked this plan again in favor of reflective glass lamps, a slimmer profile chair and adding a complementary color to the ceiling!  For over-stimulated like myself, this is where the real fun begins!  It's so cool to see all the turns the ship will take on the way to the destination. 


Enter Emily's giveaway and check out our Teen Room Link!


Monday, April 29, 2013

Client Sneak Peek


Over the weekend, we installed one of the kid's rooms that we've been working on. This room belongs to a darling seven year old boy who has been staying in his sisters' room because he didn't like his own room!  He loves stars and we thought, what better way to get him to enjoy his own bed again.


Nancy handpainted constellations on the ceiling.  As he rests his head, he can look up at his zodiac sign, Aquarius.


We are still waiting for the light fixture (on back-order for another month) to complete the install, but wanted to document the progress so far.


This particular family contacted us after the Mom got a bonus at work and graciously decided to give her two preteen girls the bedroom of their dreams.  When we met with them to interview them about the girls room, they decided it would only be fair to do the little boy's room, too!  So we squeezed both room designs into their budget so everyone gets a new 'look'!

We are installing the girls' room in two weeks, so more to come then! 

- Nancy & Bethany