

When some of you suggested I bit off more than I could chew, I thought 'nah, I can do this'. Well, I do have another day job, a huge beckoning yard AND I didn't factor in mistakes, so this was a great learning experience for me.
Here is my breakfast room BEFORE:
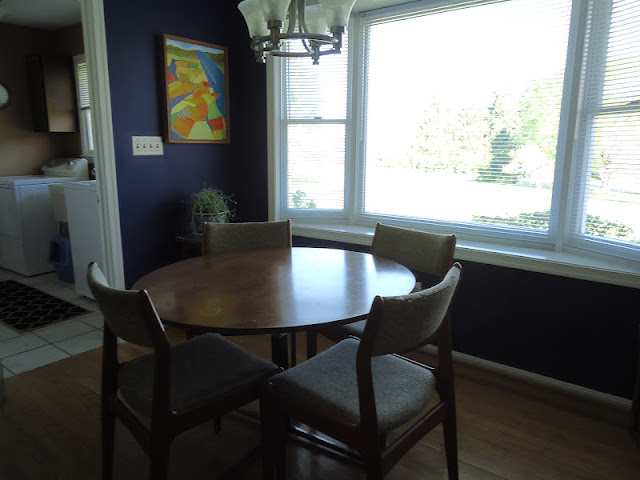
Here is the AFTER:

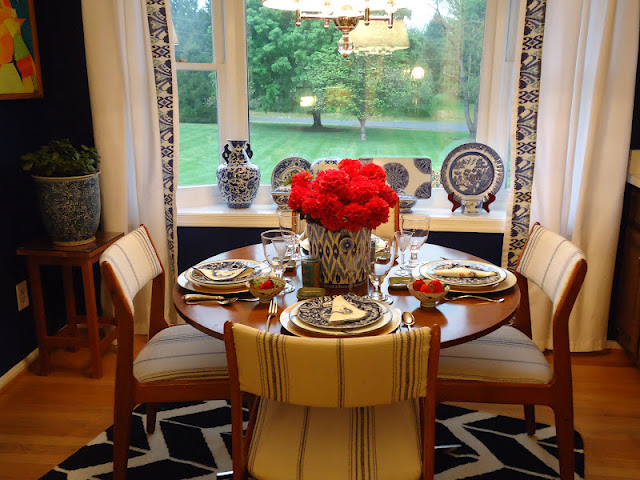


I do want to know how to make all these things, so I took on the challenge and the deadline. (which was the hardest part!) So many of my rooms are not 100% finished, so this made me realize all the little finishes I need in some of my other rooms, cause IT REALLY MAKES AN ENORMOUS DIFFERENCE! (duh)
Here is my breakfast room BEFORE:

Here is the AFTER:


 |
| (alright I seriously need to makeover cabinets and counters next, maybe a pendant light ASAP ) |
I do want to know how to make all these things, so I took on the challenge and the deadline. (which was the hardest part!) So many of my rooms are not 100% finished, so this made me realize all the little finishes I need in some of my other rooms, cause IT REALLY MAKES AN ENORMOUS DIFFERENCE! (duh)
One of the big challenges was my faux roman valance over the kitchen sink. I watched a few online videos and researched directions, but getting those folds straight and aligned without sagging was tricky, to say the least. AND, in my blinding effort to forge through this I accidentally cut the extra length off my shade on the width end (and made it 42" wide) not on the bottom of the shade. So I had to piece another width to the side of the valance so it would span 54" and then add another piece of lining to the back all seamlessly so no one would notice. I think I pulled it off. My husband helped talk me off a ledge at midnight one night 'cause I was bound and determined to get it installed in one day. It took me one whole day to make a little valance!
Here area my Danish modern (MCM chairs that are 40+ years old) BEFORE:


Here is my light fixture BEFORE (I upgraded 5 years ago to stainless and never was thrilled with):

and here is my new fixture, AFTER:

The trim fabric ,Sumter Ikat Sky, was added to white panels from West Elm, BEFORE:

DURING:


with assistance from the cat:

AFTER:

My kitchen window BEFORE, sans valance:

DURING: ( see big mistake here)


with faux roman valance AFTER:

Add the Jill Rosenwald "Fallon" rug:

Here are some more pics from our own photo shoot:


Total cost of makeover = $406.
light fixture $89.99
Drapery panels: $40.00
2 yds. Trim fabric: $17.96
2 yds. Seat fabric: $121.45
Scotchguard $7.99
Rug $129
Thank you Linda, the founder and fellow "undaunted dozen" for joining in this challenge and pushing us to finish a project! Can't wait for Spring Into Action, Part 2 -- no time soon, please!
Kerry at Design du Monde
Suzy at Saved by Suzy
Tiffany at Living Savvy
Laurie at Traditional & Modern
Cathy at Room Rx
Carrie at Hazardous Design
Lisa at A Room with A View
Sam at The Junk House
Becca at from Gardners 2 Bergers
Jean at Flower Hill Design
Linda at My Crafty Home Life
xo Nancy

P.S. There is no solution for a crimped shade. Im ordering a replacement for $40.
P.S. There is no solution for a crimped shade. Im ordering a replacement for $40.


